|
MMS get started training step 1
Click here for MMS training step 2
Need help with infusion call 1.866-800-0004 ext. 2
Index:
1. Overview and keys to success
2. Getting started in MMS
3. Managing your tasks with My Day and Task manager
4. Managing your tasks with All Tasks manager
5. Managing Member Tasks - Using Contacts
6. How to look up a member fast
7. How to view members' contact records
8. How to send a welcome or other e-mail
9. How to add a note
10. How to reschedule and mark a task as completed; Medicare Tasks
11. How to add a Task
12. Tags
13. How to schedule an Interview through MMS
14. How to schedule an Interview not through MMS
15. How to Cancel Future Tasks/Campaigns
16. What to say when you call
Click here to watch a video and learn from Top advocates how to
manage you members and maximize your income:
1. Overview and keys to success
This training will help you understand how to use the member management
system (MMS) powered by infusionsoft to be a successful advocate.
MMS will assign members to you and prompt you with tasks when to call
members and what the flow of the conversation should be.
Following the the five keys to advocate success and the training
tips below will make it easy to succeed as an advocate.
 1. Completing tasks in MMS so your My Day is current
2. Calling members registrations on time, especially the first call within four to six
hours after registering.
3. Completing all three call attempts for qualified members
4. Updating MMS with notes and tags after each call
5. Getting interviews scheduled with 95% of the qualified members with
whom you speak.
2. Getting started in MMS
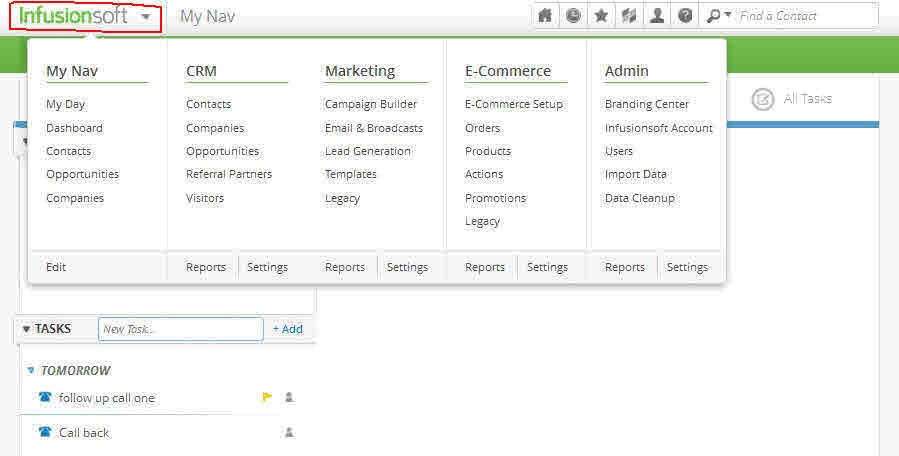
A. Master My Navigation is the first screen you want to become familiar
with. Log into MMS and then hover your mouse over the Infusionsoft logo
in the top right.
Steps 3 and 4 show you how manage your tasks in your MMS
account with My Day and All Tasks feature. Both are effective,
and you may find using a combination of both to be your key to success.
Whatever your approach is, working the tasks assigned to you for your
new members is important.
3. Managing your task with My Day
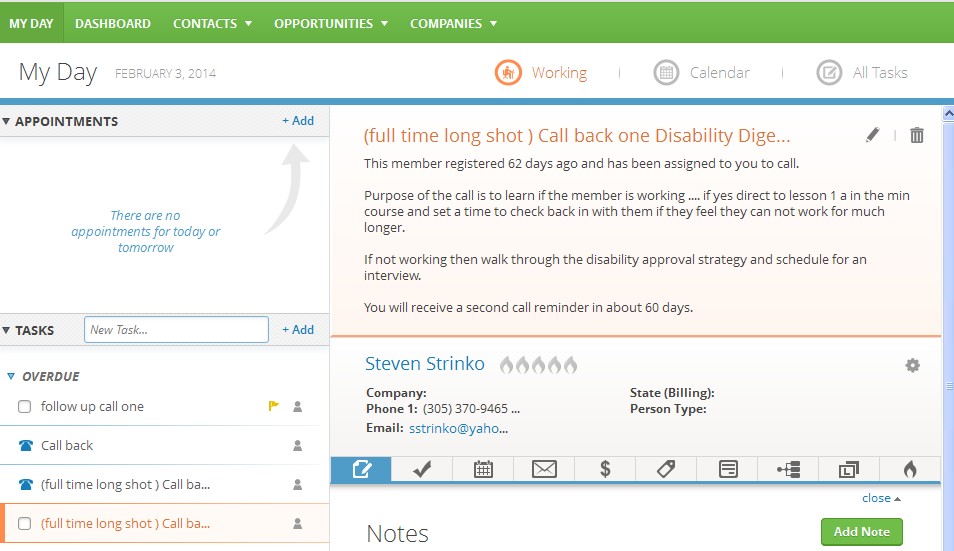
From the Master navigation, go to your My Day, click your first task under Tasks
on the left. See screen shot below.
A brief summary of the member’s information and call back outline is displayed
either to the right or below all your tasks.
With My Day on the screen, click on the first task, look at the notes to see any prior activity. If none or if have tried to contact and have not been successful, start calling the number and while it is ringing, click the internal forms icon and open up the registration (see screenshot).
A. If the member does not answer or the number is not in service, click on the notes icon, enter notes as to why a the phone number is bad and tag as bad phone number so that an email will go automatically to the member regarding the bad number.
Don't clear out all future tasks for a disconnected phone number simply because the phone may get reconnected. If it is a wrong number, then clear out the tasks/campaigns (see section 15 below).
B. If the member answers, click into the contact record (the member’s name) and open an interview draft form in internal forms (far right on down) to fill out responses for the interview. For more information on how to do an interview, see sections 13 and 14 below. If the interview is sent, clear out the outstanding tasks (section 15) make sure to enter a note that the interview was scheduled and with which representative.
C. Lastly, at the My Day screen showing the list of tasks, click the task as done (today's date is automatically entered so you don't have to do this manually) and click on the next task.
If there are any notes, these are immediately shown. Click the member’s name
to enter his member page, click the Select an Action button on the immediate
right from the green Save button, and select Display Info as text to see what
the member’s situation is before making the call. While the phone number is ringing, click the task you are completing, enter the date completed, and click the green save button to save it. The completed task automatically shifts to the completed tasks section.
4. Managing your task with All Tasks manager
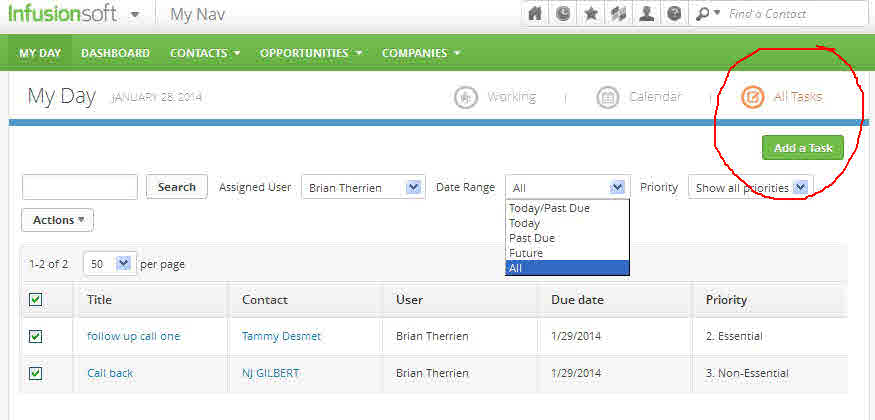
From the Master Nav, Go to My Nav, My Day, on the far right click on All Tasks.
Here you can manage all tasks from the drop down. Below are task for Tammy
Desmet and NJ Gilbert.
5. Managing Member Tasks - Using Contacts
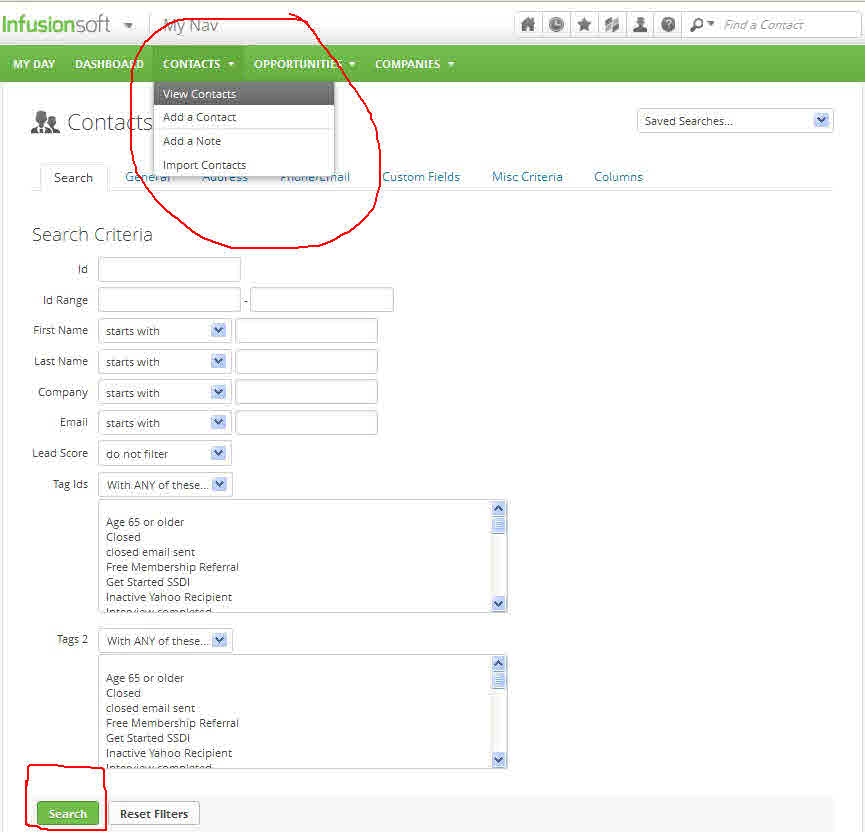
A. To view your Contacts, go to Contacts in the green bar below the master Nav, click
Contacts, and go to the bottom and click the green button labeled Search. See screen shot below.
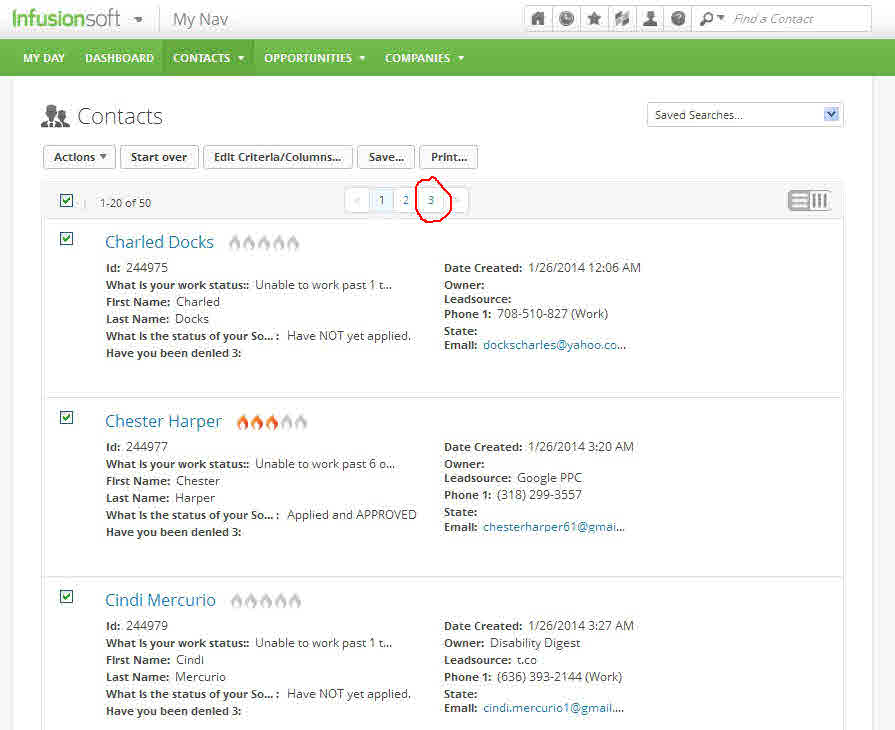
B. To view newest assigned members, go to the top and, using the right arrow, go to
the last page of your contacts, which will display your newest assigned members.
However, you may need to go back one page if not all of your new members are
shown on the last page.
In the screen shot below, page 3 would have the most recent members and page
one the oldest.
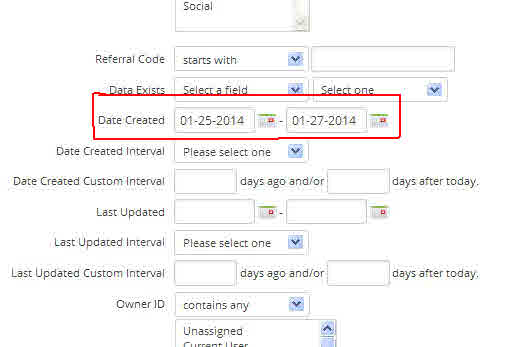
Here is how to look up a specific date range of members assigned to you. In the
green bar below the master Nav, click Contacts, just like the directions above. Before you select search, click on Misc Criteria, and adjust the date created. The example below is for January 25 - 27.
For The Fibromyalgia Digest members, you may need to double-check your
email and search for them, as they do not always fall in the correct sequence
of members assigned.
6. How to look up a member fast
A. Enter first name and last name in find a contact on the upper right as shown
in the screen shot in step 3 above.
B. To look up a member fast, enter the first name (and last name if
you have it) or email address in the “Find A Contact” field at the
upper right of the screen in My Nav as shown in the screen shot in step 3 above.
7. How to view members contact records
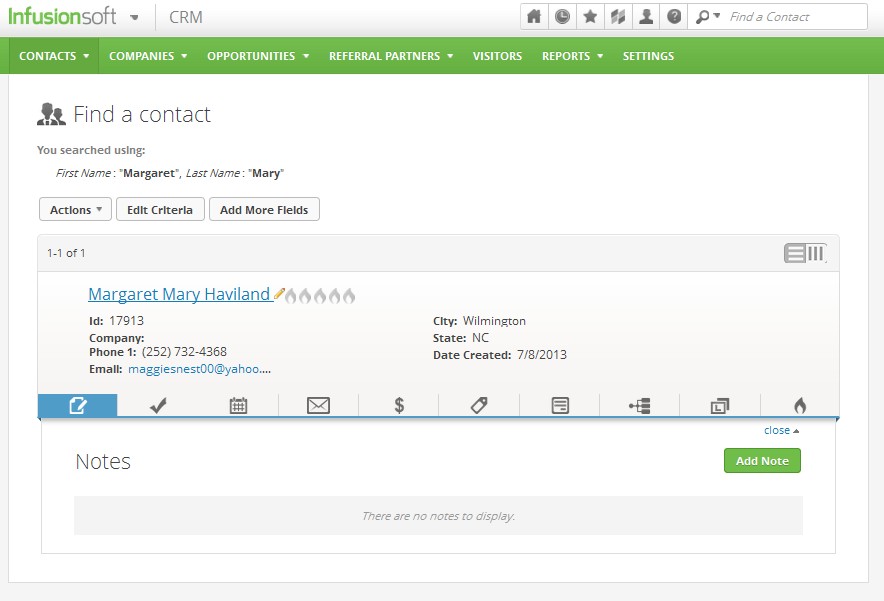
To review each member, move your cursor over the first name (like Margaret Mary
Haviland in the screen shot below) you want to review.
Also, check the task date (checkmark icon). If there is a task to be done, see Completing Tasks below.
8. How to send a welcome or other e-mail
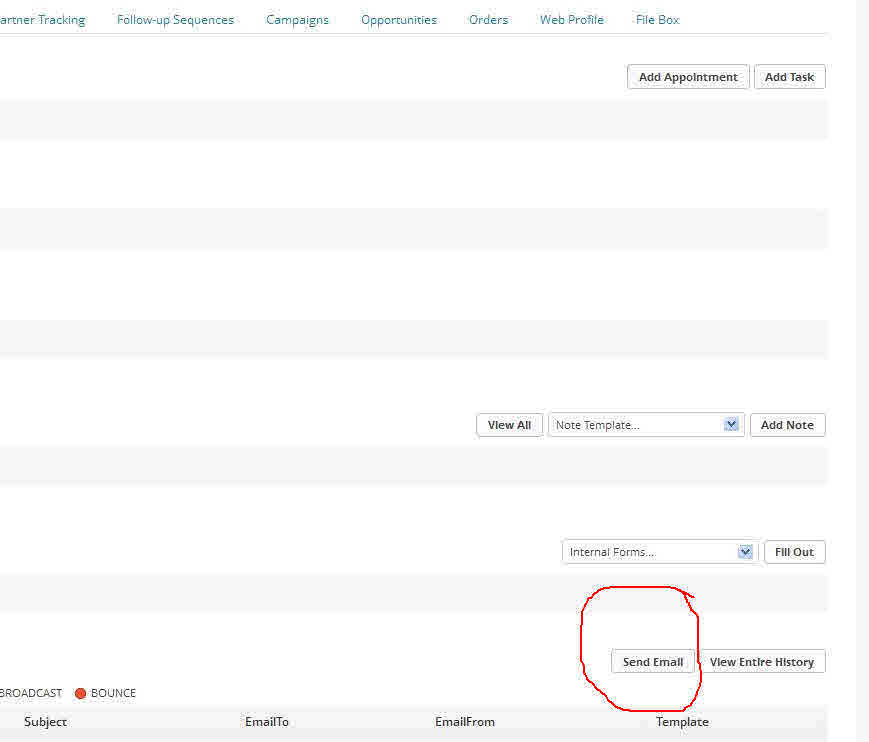
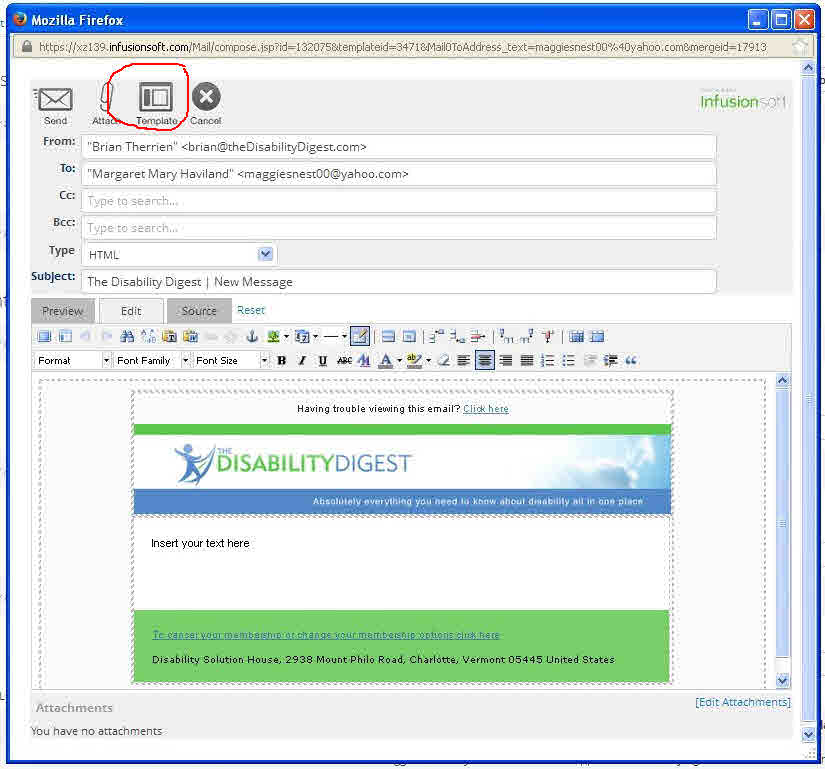
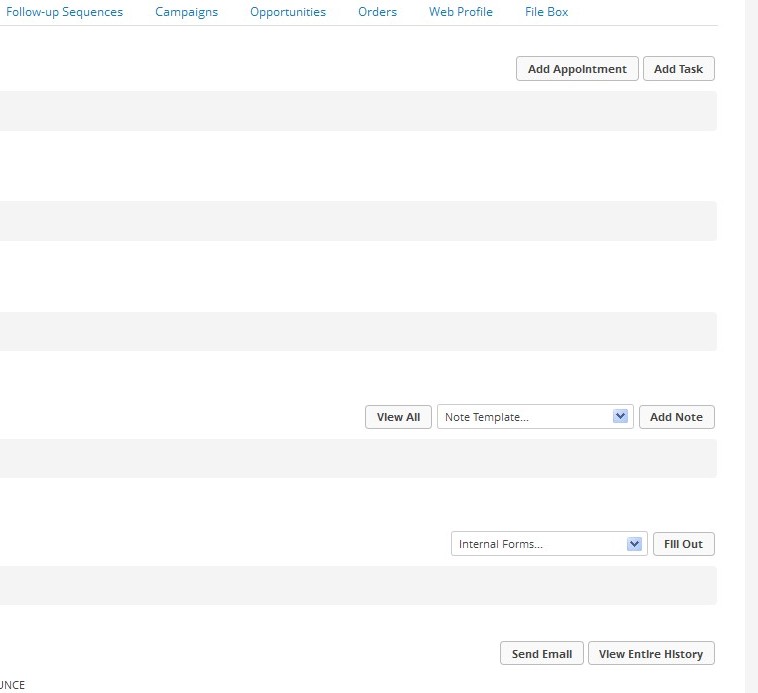
To send a welcome email from within the member’s contact record, click the Send
Email button at the bottom right of the screen next to the button View Entire History.
See screenshot below.
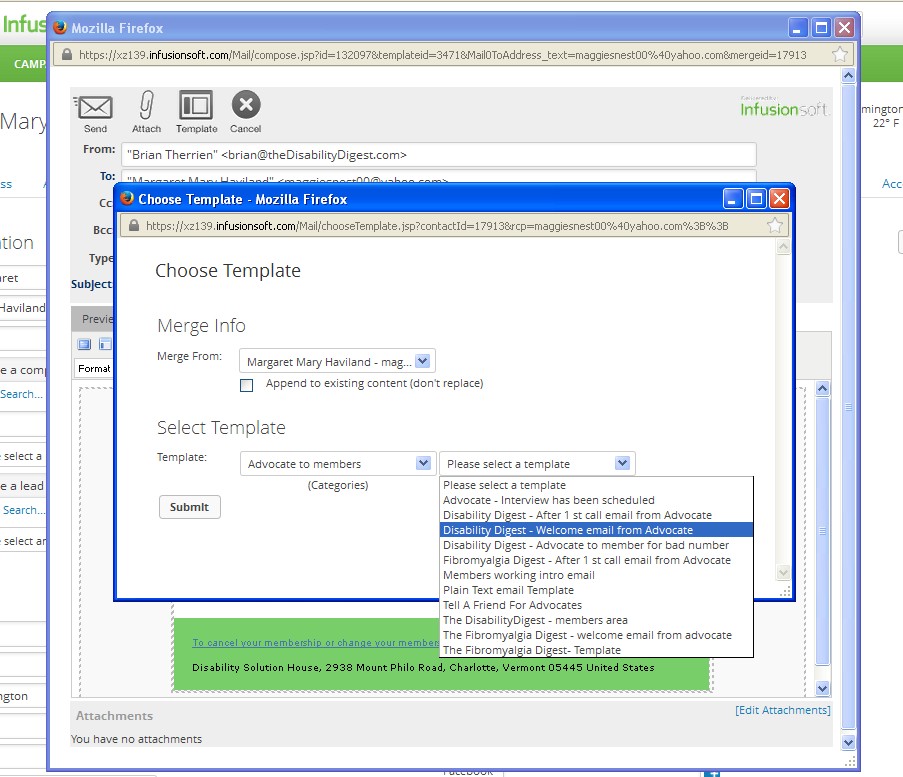
Next, click Template in the window that opens, then the button labeled Please select a
template, from the dropdown menu select Disability Digest Welcome Email, and click
the submit button on the left.
Note: Your name and phone number should appear in the email; if not, go to Edit My
Profile (the icon with a person’s head) and enter your information and click save.
When on the members page, look at the bottom right of the screen next to the button View Entire History, click Send Email (screenshot), click the icon Template in the window that opens,
then the button labeled please select a template, from the dropdown menu select the email
you want to send, and click the Submit button on the left. Type in any missing information
and click the Send button at the upper left-hand side of the email screen.
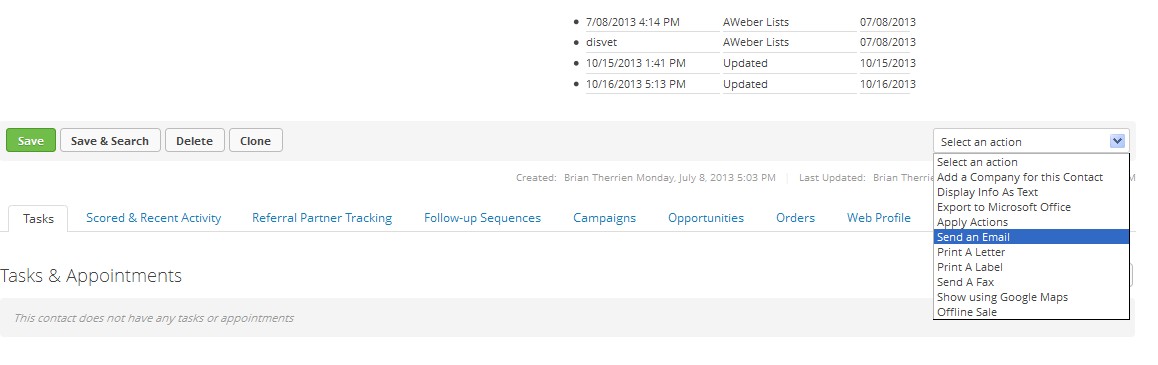
More on how to send emails:
There are different areas to do this. You will see the envelope icon in some places.
From the select an action feature below you can send and email.
9. How to add a note
Click the Add Note button on the right of the screen, and make a note of what you did.
There are also optional tags that you can add and some required tags that should be added
for Digest reporting purposes. Tags are discussed in-depth later. Here are examples of notes for outcomes from calls:
Called no answer sent an email
Called left voice mail message, sent welcome email
Called left message with a person
Working will call back in 60 days to check on work status
Spoke with but does not qualify for an interview
Bad number: tag for a bad number as covered below
More on how to add a note:
It is helpful to add a note for every task you complete and pertinent information you
find out about a member. You can add notes on the members page by scrolling down
to the add Note button or in the abbreviated list of members display by clicking the
Green Add Note button. See screenshot below.
10. How to reschedule and mark a task as completed; Medicare Tasks
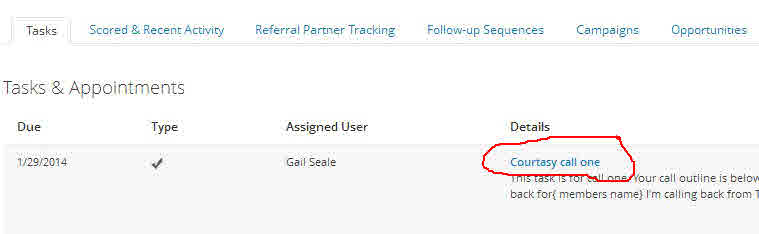
A. To reschedule a task, click on the blue words in the task title. In the screen
shot below, that would be Courtesy call one.
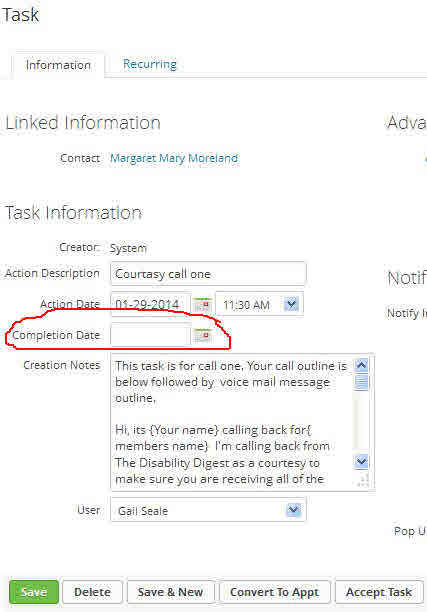
In the field labeled Action Date, select the new date for the task. See action
date in the field below. An example of when you would reschedule a task is if
you speak to a member and they would like you to call them another day.
B. To complete tasks
Open the task (click on the title of the task which is highlighted in blue) and
select the completion date in the calendar that pops up (see screenshot below).
That task is then automatically moved to the completed tasks section which
is below the Tasks & Appointments section.
C. Medicare Tasks
When scheduling the interview, you will fill in the estimated date the member will be eligible for Medicare, ie., two years less two months from the date they were determined to be disabled (usually the date they stop working). For example, if the member says they stopped working June 1, 2012, you would set the task as May 1, 2014.
Once the task appears in MMS, you will have to go in and reset the date because the date reflected for the task due date is the date you set the interview, not the date you fill in on the interview form. Click the task, edit the date, and close.
For members who have an attorney, manually schedule the task for that member. If you have no idea, it is suggested that you put 10/1/20(the next year or two years later). Medicare-eligible members can change their Medicare plans at that time.
11. How to add a Task
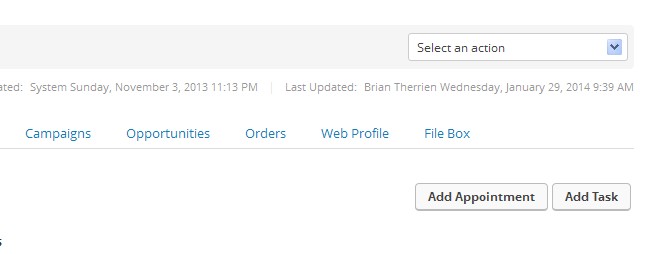
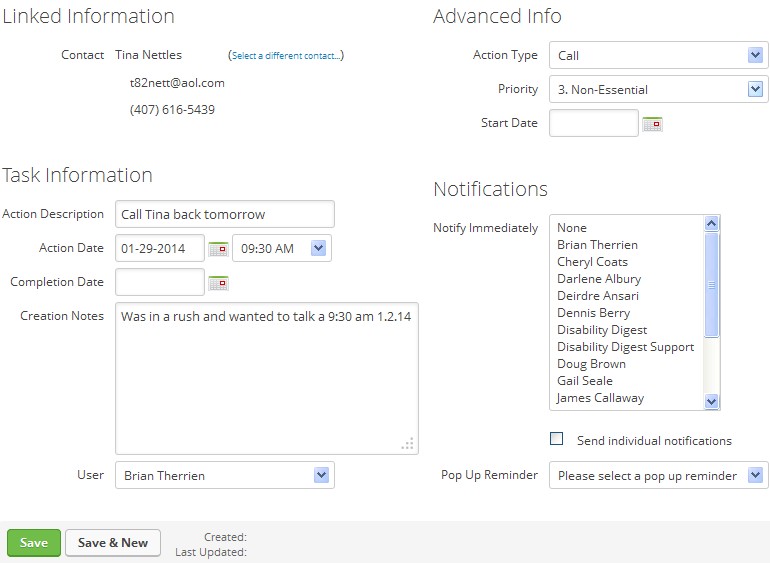
To add a task, under Tasks & Appointments, click the Add Task button on the right,
under Advanced Information, then
Priority and select 1 Critical (screenshot). Type in your action description
in the field labeled Action Description. Go to the bottom and click the green
Save button.
An example of when you would add a task is a reminder date to call a
member back regarding a specific issue they have.
12. Tags
Tags allow you to quickly make a note in the members contact record and
help us divide contacts into very specific lists so we can identify and sort
members into groups.
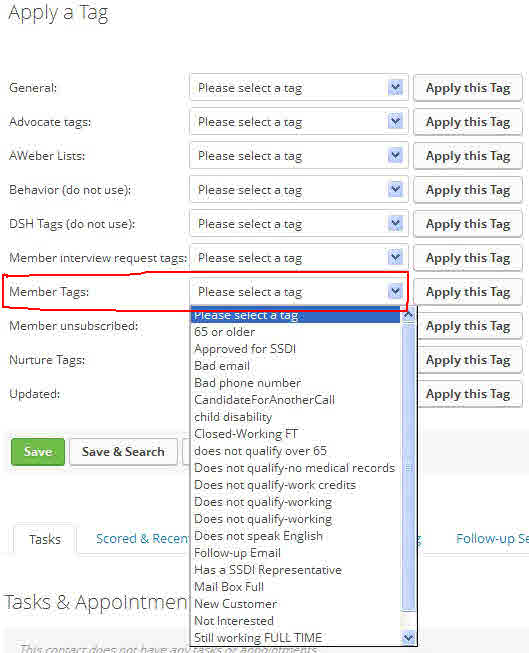
When you want to add a tag to a member’s file, you need to decide if it is
a member issue or an advocate issue. Member issues usually include such
things as the member does not qualify-working, has a representative, etc.
Advocate issues usually include such things as 1st and 2nd calls, interview
scheduled, bad phone number, bad email, etc.
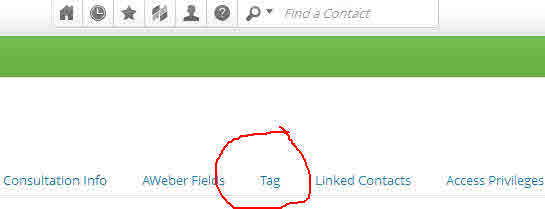
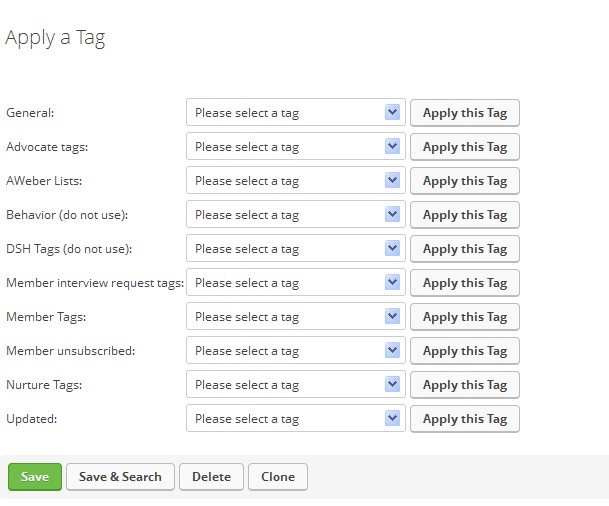
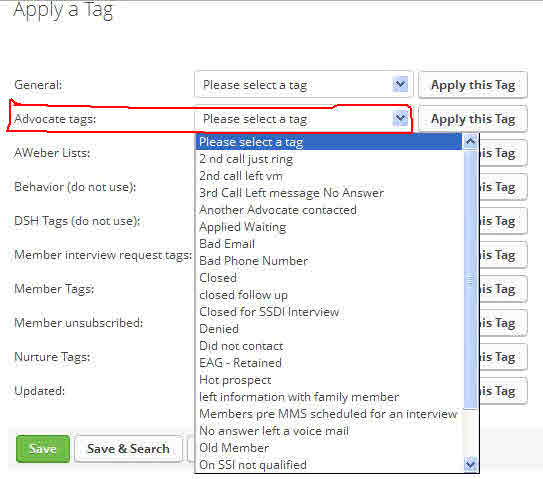
Click on the Tag tab at the top, which will open up a list of tags. Go to
either Advocate Tags or Member Tags, from the drop down of either,
choose a tag and click on Apply this Tag. It is not necessary to click Save.
DO NOT USE DSH TAGS OR BEHAVIOR TAGS
Examples of how you would use your tags:
If you called a member and there was no answer, then select the tag
"no answer left message,” and click apply tag.
If a member does not qualify for an interview from Advocate tags select
"Closed for SSDI Interview" and apply.
If it’s a bad phone number, add the tag Bad Number from Advocate tags.
Required Tags That Should be Added When Applicable:
From Advocate tags: Scheduled for Interview (only for interviews not
scheduled with the MMS Interview system in step 12), Bad Phone Number,
Bad Email
From General: Candidate for another call to be used after you have attempted to call the member the customary three times and you believe the member is a viable candidate for another call. See the representatives overview spreadsheet promotions tab for more details and incentives.
The rest of the tags are optional and are to be used as you
personally see fit.
PLEASE DO NOT CREATE TAGS. If you have a tag suggestion,
please submit to the advocate meeting questions for review.
13. How to schedule an Interview through MMS
At the bottom of a member file, on the left from Form Submission, click the arrow
beside Internal Forms, select the form for the representative to whom you are
sending the interview (screenshot), and click Fill Out.
Go through the questions with the member and enter their responses on the
form that is displayed. When finished, click save to send automatically the
information to the representative with a copy to you (screenshot). When you
click save, an “interview has been scheduled” email will be sent to the member
and the interview submission with be reflected under Form Submissions above
the member’s registration(s).
To confirm the interview was sent, scroll to the bottom of the contact record
and look for blue link with words like this: Employee Advocacy Group (EAG).
Also, in less than three minutes after the interview has been scheduled, this
tag will appear in the contact record as "Scheduled for an Interview" under
Current Tags.
In the MMS contact record, make a note that it was scheduled and with
which representative.
Follow the directions in step 15 How to Cancel Future Tasks/Campaigns and cancel
any future tasks.
Lastly, enter the referral information into the appropriate Google spreadsheet.
Watch this video below to see how to schedule an interview in MMS.
Note the email confirmation link and tag interview received by representative feature in the video are
no longer part of the process, and if you enter all capital letter for a word like this (TRAMADOL), the form
will not submitt.
14. How to schedule an Interview not Through MMS:
A. For all representatives not Through MMS, click here and follow the
directions in the video.
B. Tag the member’s file with the “Scheduled for Interview” tag
in Advocate Tags and make a note that it was scheduled
and with which representative.
C. Follow directions in step 14 to cancel tasks/Campaigns and cancel any future calls.
D. Lastly, enter the referral information into the appropriate Google spreadsheet.
15. How to Cancel Future Tasks/Campaigns
Cancel future tasks/campaigns when you no longer need to contact
the member any further, such as an interview has been scheduled,
a bad phone number, member has a representative, member
does not qualify for SSDI, or member is not interested.
Click the blue Campaigns tab in the center of the member
page just above the Tasks & Appointments section, scroll
down the Upcoming Campaign items, and click cancel by
each upcoming task (screenshot). You are usually cancelling
Call back 2 day 4 and Call Three. Choose the Cancel button
below the Create button. You will then see a pop up at
the top asking you to confirm you want to Cancel this item.
Choose OK (screenshot). Cancelled tasks will automatically
go in the Recent Campaign History.
16. What to say when you call
Scripts for the call flow appear in the My Day preview and
in the text box when you open a task.
17. How to customize your MMS account
In MMS on the top tool bar click on the person.
Its to the left of the question mark.
Then select "Edit My Profile"
-------
|